Jim McCoy Takes On Elephant Hill
By Jim McCoy.
I started my camping last year by hitting the 2014 Overland Expo West near Flagstaff, Arizona. There I caught up with truck camper builders I have become friends with through Truck Camper Magazine; Four Wheel Campers, Hallmark RV, and Phoenix Custom Campers. I also ran into XP Campers and the TCM Expo West reporters for this year, D.Gorton and Jane Adams. As always, Overland Expo West was a blast.
After the Overland Expo, I tried a route from Big Water, Utah, to Escalante, Utah, that looked doable on the maps by a truck camper, but I wanted to recon it in my Jeep first. If it panned out, I would take my truck camper at a later time. It included a place along Lake Powell called Alstrom Point that I have seen other four wheel drive truck campers post photos of on the web.

Above: At Alstrom Point, looking north over Lake Powell.
From Alstrom Point, I continued following backcountry four wheel drive roads to get to Escalante. They covered about 125 miles of scenic canyon country along Lake Powell, and then climbed up onto 50 Mile Bench and skirted a canyon wilderness area. I spent a few days up on the bench exploring some of the canyons in the wilderness area on foot. Continuing the four wheel drive route, I dropped back off 50 Mile Bench on its western end onto Hole In The Rock Road, and then continued northwest to Escalante.

Above: Shooting Star Campground.
In Escalante, I discovered an incredible campground, for those that like to enjoy them. Truck campers and all other travelers will love it! It’s called The Shooting Star RV Resort. This was a huge campground area that is suitable for jamborees or just finding a quiet corner. It boasts all kinds of 1950s cars around the property as well as an old fashioned drive-in theater! They serve refreshments from a refurbished Airstream, and you can rent a 1950s convertible to watch the movie from. Hook ups, water, and WiFi is available. Very friendly staff and a low key place.
I did a few local trips around my part of Colorado, but I also took my off-road truck camping to a new level this year and undertook three major trips. They were more like big expeditions.
I had read about the Colorado Backcountry Discovery Route that a motorcycle group put together, traversing the entire state of Colorado north to south on off-road double track routes.
From what I researched, it looked like an off-road four wheel drive enthusiast truck camper could do most of it, while seeing some incredible less-traveled back roads. I used two state atlases and highlighted all the roads comprising the route. They were all pre-existing mapped forest routes that linked up to make the route. I also picked up a few topograhic maps with higher detail of certain areas to make sure I had it all covered well.
With a heavy duty set up four-wheel drive truck and my lightweight Hallmark camper, I embarked on an amazing journey along Colorado’s back ways and four-wheel drive roads, from Wyoming to four corners.
I broke the adventure into two separate trips. The first or north half of the state, covering from Wyoming to Buena Vista Colorado, taking five days. And the second trip, or south half of the state, continuing from Buena Vista to the Four Corners area. The southern half can be done in as little as four days, but give yourself more time to enjoy things along the way.
The north highlights were sweeping mountain and countryside vistas, and following of the Colorado Riverway for a whole day.

Above: A north section paralleling the Colorado River
The south highlights were more mountain vistas and four-wheel drive passes, sage country, and the incredible scenery and rugged four-wheeling through the San Juan Mountains. The San Juan Mountain part of the trip was mostly Jeep trails, which can be challenging in a full-size truck and pop-up camper. Squeezing my truck camper down Corkscrew Gulch literally had me on the edge of my seat!

Above: A south section of the Colorado Backcountry Discovery Route in Sage Country, outside of Gunnison Colorado.

Above: Climbing the Cinnamon Pass road over American Basin, in the San Juan Mountains.

Above: Camp set near the historic ghost town of Animas Forks, along the California Gulch Trail.

Above: The California Gulch leads to California Pass summit, which is 12,960 feet above sea level.
The entire route north to south was about 600 miles of winding back ways and 4×4 roads. Some sections are very rough and technical. But, it can be done in a lightweight truck camper with a very experienced driver. I can’t imagine how the cross country motorcycle guys are getting through some of it.
I thought I had found my favorite route of the year with the Colorado Backcountry Discovery Route. But, that route got my wheels turning to develop a route of my own, to go through some of my favorite places and discover new ones. I think I outdid myself for this one, and fellow off-road truck camper, Larry Wittman, will probably agree when he hears this.
By studying state atlases and topo maps, I developed my own backcountry truck camper route from Mexican Hat, Utah, to Moab, Utah. As the trail wiggled, it traversed 220 miles, 90% of which was dirt and four-wheel drive roads, with the 10% pavement being necessary connectors. I took eight days to cover that terrain, taking my time to camp, explore, and enjoy certain areas along the way.

Above: In the heart of the Needles District, Utah.
Some were easy dirt roads in awesome Utah backcountry, and some where demanding 4×4 roads through Beef Basin, The Needles District in Canyonlands National Park, and Lockheart Basin. It included getting the truck camper over the infamous Elephant Hill!
In my many previous crossings of Elephant Hill, which is a single lane road, I had never met opposing traffic. It figures that this time in my truck camper, despite beeping my horn in warning of my ascent, I came face to face with a Jeep on one of the steepest sections. And ironically, it was a Park Service Law Enforcement Vehicle patrolling the area. It turned out that the officer and I had a friend in common at my fire department back in the Denver area. I managed to talk the officer into filming for me as I passed his vehicle. Small world!
Click to see Video.
I got to see some of the most remote canyon country around, as well as wild historic Anasazi ruins and dwellings, petrogyphs and pictographs. I had some amazing solitude, and both good and bad weather. A couple of nights I was really glad that I had the comfort of the heated camper when it dropped well below freezing and snowed. Luckily I didn’t get snow accumulation were I was, but the mountains around me got ten inches. It was the season’s first big snow for the Abajos and Manta La Sals over Moab.
The Lockheart Basin road (65 off-road miles from the Needles to Moab) presented a challenge when I found a 4×4 traveler’s vehicle wedged and stuck in a narrow canyon passage. There was no way to get around him. He also had a stalled engine and dead battery, and there was no way to stretch cables to him. I had to dig out my camper’s deep cycle battery and hike it down to jump start him.
The two hours to unstuck him is a story in itself.
As I said, the route took eight days to do and I covered 220 miles. I had five gallons of extra fuel but didn’t use it, chugging into Moab with still 3/8 of a tank of diesel. I’d be glad to share the route, but please don’t attempt this unless you have the right rig, and know what you’re doing.

Above: Lockhart Basin at Hurrah Pass
Great Memorable Moments from the Year
I four-wheeled into the famous Crystal Mill, which is one of Colorado’s most photographed landmarks. I was out there for two days in the pouring rain. I’m so glad I had the camper. Well, I was waiting and waiting for a good photo op of the mill, but all I had was rain, rain, and more rain.

Above: The Crystal Mill.
On my second day, at the end of the day, just as the sun was about to set, the sun broke through, sank into a hole in the clouds, and I got about two minutes of sun on the mill. It was still raining at the Mill, but the sun cut through and made a rainbow over the mill. I have never seen any photos anywhere of it with a rainbow. Mine may be it! It was so worth the two days there!
The other great moment was when I was along a section of the Colorado Backcountry Discovery Route on the west side of Hagerman Pass, which is a four-wheel drive pass. I got off the main route two miles to camp at a lake I saw on the map. It was a little work to get to it, but so worth it. I had the lake to myself.

Above: The Lake off the Hagerman Pass Road.
The next morning, after making a pot of camper coffee, I hiked around the lake. I was taking photos of the camper from across the lake when I heard some noises nearby me. I sat quiet and watched in that direction. A mamma moose and her two calves came out of the woods a couple hundred feet from me and started feeding in the waters along the shore. Wow! Not a typical thing to see in Colorado. I got to watch and take photos for forty-five minutes.

Above: Moose at the lake.
If you attempt The Backcountry Discovery Routes, or any backcountry areas for that matter, be prepared! There usually aren’t many other travelers along many of the backcountry routes. Experience, off-road skills, and a well equipped four-wheel drive vehicle are a must. If you are down in the Canyonlands area, off road or not, have extra fuel! It’s easy to put on a lot of miles in those areas exploring around and go through fuel.
The Needles Outpost boasts having fuel, but it is at a king’s ransom and gasoline only. No diesel. And occasionally the pumps are down. They also close the pumps for winter at the end of November and reopen in spring.
There is no cell signal for most of that area. You will need maps. Maybe different types and brands so what one lacks the other picks up. You must be self sufficient.
The things that I liked most about this past year were the discovery of places I had not been to before. Places that I said, “Wow! I had no idea this place existed!” And I was totally impressed to discover them, and want to go back and explore in more detail. Some of which were hidden “in my own back yard”.
OFF-ROAD ADVENTURES The Furmans Take On The White Rim Trail Utah.
Bertram and Kare Furman report on their experience on the White Rim Trail with a Northstar TC800 pop-up camper. Turn hard at Hardscrabble, gun the diesel, and don’t look down.
First, I must say, “Wow”, the White Rim Trail is big! When you are down in the canyon, it is difficult to gauge the scale of the formations around you until you see a truck or a person for perspective. Even then the distance and size can be deceptive.
The White Rim Trail has been on my list for a long time. I didn’t want to do it alone as the trail is far from help, if needed. Luckily, my friend Dave has also been interested in doing the White Rim Trail for a long time and worked very hard to get permits. There are not many campsites down on the trail, so access is very limited. Maybe one to four sites per camp zone. As the trail is in Canyonlands National Park, it is highly regulated.

Above: The group that tackled the White Rim Trail. Bertram and Kare are on the far left.
Dave, our team leader, has an 1987 Toyota Land Cruiser FJ60, a classic. He outfitted a screen safety door on top of his racks to use as a platform to carry much of his gear. He needed to do this because his wife invited two of her friends to join us; two women from Sweden who were originally from Cuba and Czechoslovakia. One was here for a conference. For the other, this would be her first time to the states. What a cool way to see our country! She rode with Eric in his 2008 Dodge 2500 CTD with a Four Wheel Hawk, which is a perfect set up for this trail. A light camper on a powerful truck.

My rig is a 2004 Dodge 2500 Cummins turbo diesel with a Northstar TC800 pop-up.
There were a lot of logistics to the trip. For starters, I needed to make sure my truck was ready. I took my truck in for fluids, a new air filter, and to check for any loose bolts and fittings. I thoroughly inspected the truck as well. My nine year old tires were looking a little dry-rotted, so I replaced them with Bridgestone All-Terrain E-rated tires. I thanked myself many times on the trail for doing this.
The drive out to the White Rim Trail from San Diego was a two-day drive, seven hours per day. It took some planning to determine where our layover days would be. We expected to be on the trail for six days, and we needed to have enough food and energy. Typically, we can go two to three days on our one battery before using the generator, and we can pack about three days of food in our refrigerator. Also, many of our longer trips bring us through towns to restock.
This time we took a large cooler with both block and cubed ice. Because we were driving every other day, my batteries would get re-charged by the truck alternator. This worked out. The other fellow with a camper coming with us, Eric, had a solar panel on his camper and a twelve-volt cooler to supplement his refrigerator. I envied his solar. Dave was using dry ice for cooling, and was tenting.

Above: The White Rim Trail is in Canyonlands National Park, Utah
The entrance to the White Rim Trail is Shaffer Road, which was built in the early 1900s to get to Uranium that was supposed to be in the canyon. As I understand the history, some was found, but not that much.
The road is on a layer of White Rim Sandstone deposited some 220 million years ago. The depth of these canyons goes back 320 million years. For perspective, the deepest canyons where we live near Anza Borrego State Park go back about eight million years.
The Canyonlands National Park canyons are huge, both in breadth and depth. And also in beauty! The views were stunning.

Above: The three rigs that tackled the White Rim Trail
Even though the Shaffer trail is steep, windy, and on the edge, it is not that hard to drive. However, it is steep with sharp turns that kept me on my brakes. The road is slightly rutted which caused some camper rocking. The road on the east side of the White Rim Trail is easier compared to the west side.
I didn’t air down as I was waiting to see if I would need to. I never did, but I think ten to twenty pounds might have made the ride a little smoother.


Above: The first leg of the White Rim Trail
The rest of the road to our first camping spot was slightly rocky, but not too bad. When we arrived at our first camp spot, called Airport, it was very windy. We decided to create a U-shaped wind block with our vehicles for the tents. Even with the wind block, the tents did get battered around quite a bit.

Above: The U-shaped wind block
We were able to fit all seven of us in my camper to hang out, stay warm, and out of the wind. A great thing about the interior of my Northstar TC800, which does not feature a bathroom, is the open interior space. Room enough for seven!
It was fun to be packed into our camper drinking wine and getting to know each other a little better. The Four Wheel Camper had a head and shower, which took up a lot of room for a small camper.

Above: Seven people staying out of the wind and warm in Bertram’s Northstar pop-up camper (the seventh person is obviously taking this picture).

Above: The view from the campsite.
The campsite was nice with only one other group. The pit toilet was clean and had a great view. After all, it is a national park!


Above: Traveling the White Rim Trail and White Crack campsite – click to enlarge
The next day we were off to White Crack camp. The going was pretty easy with some great views from the apexes of the canyon edges. Truly spectacular!

Also, it was a little it scary as we drove around the edges. As you see all around us, these rocks break. The trail was rocky, but not too technical. Basically, the White Rim Trail can be done easily with a light jeep type vehicle.
The difficulty comes in with our heavy campers. Dave’s FJ did not have too much trouble. Eric’s Dodge with the Four Wheel Camper also did not have much trouble. My vehicle was the heaviest and I had to take the road very slow to prevent too much rocking. My average speed was about five miles per hour.
White Crack campsite is beautiful, on the edge of a spit of white rim sandstone on the edge at the confluence of the Green and Colorado rivers. It was still a bit windy so we re-created our wind block U. Again, views from this point were stunning.

The next morning we woke up to snow. None of our weather reports predicted snow. It was quite the surprise and very cold. In times like these, I love my truck camper. We were warm as a bug in a rug!

As the day went on, the sun quickly melted the snow and we had a great day hiking, resting, and shooting pictures. The views from this camp spot were breathtaking with 270 degrees of canyons. Absolutely incredible.

The next day we were off to Candlestick camp. This would take us over the famous Murphy’s Hogback. There are a few training hills before Murphy’s Hogback that you never hear about. They challenged us and got us ready for the big one. For heavy vehicles like ours, it’s a challenging up and down.

I think it is difficult to gage the largeness of these hills in the pictures. The up on Murphy’s Hogback is long, narrow, steep, and very close to the edge. The down has some steep parts, is close to the edge, and has the famous overhang, which would be challenging for a tall hard-sided camper.

Above: One of the training hills.


Above: The sway bar linkage broke, but was not a significant break – click to enlarge.
And what would any good adventure trip be without something breaking? A few miles later, I was navigating a down when I heard a clunk sound from my front end. I broke the right sway-bar linkage. I was thinking of undoing these before the trip, but didn’t. Fortunately, this was not a significant break.


The rest of the way to Candlestick wasn’t too bad. There were some hard rocks with potholes, and a few more ups and downs. And big views!

The camp is near the edge of the White Rim Sandstone. The layer here is very thick. There is lots of great hiking from this campsite and views of the Green River.

There were lots of islands on the rocks where water, cryptobiotic organisms, flowers, and shrubs brought life.

Cryptobiotic organisms are organisms that can survive in extreme environmental conditions such as drought, freezing temperatures, and low oxygen by stopping all metabolic processes including reproduction, growth, and recovery.

Cryptobiotic organisms are dormant until the environmental conditions become favorable, at which time they will resume metabolic reproduction, growth, and recovery. The classic example of a cryptobiotic organism is the brine shrimp, aka Sea Monkeys. In Canyonlands National Park, the cryptobiotic organisms consist of a thin veneer of knobby black crust which can be easily destroyed by tires or foot traffic.
Our last day on the trail we had Hardscrabble Hill to go. My wife says to think of Hogback as the training hill for Hardscrabble. Hardscrabble is longer, steeper, and narrower. The turns are many and very tight. I remember this steep left turn with the edge to the left, the hard rock to the right. I remember thinking, I may not make this turn; full thrusters with the diesel, blindly turning, praying my wheels stay on the track. This is where the diesel shines, providing the power and torque for this hill.

The end of the trail is the Mineral Springs Road. It’s a lot like the Shaffer down, except going up! Again, I was thankful for the power of the diesel.
Here are some pictures from the rim top looking down on the trail. If you look close, you can see the White Rim Trail.

All and all, it was a great trip. If you ever get the chance, the White Rim Trail is where our pop-up truck campers shine.

I do believe a well set-up lightweight hard-side could do this, as evidenced by truck camper reports before mine. However, you know those guys worked it, and the overhang is tricky.

These last pictures show some of the road modifications. The picture above shows I reduced the airflow to the refrigerator’s pilot. The first night was very windy and, in order for us to protect the tents, my vent was to the wind. I left a small hole to provide the needed oxygen which kept the refrigerator’s pilot on.

This second picture shows that I lost a Fastgun somewhere on the trail. If you find it, please send it back. There’s a lot of bumping and the camper moved about quite a bit.
I carry chain and hooks for this situation and secured the camper for our ride home. The road, because of the scale, looks smooth, but it’s not. My friend with the Four Wheel nicked his stairs which hung from his trailer hitch, so we had to take them off.

We came home through Flagstaff, Arizona and enjoyed the micro-breweries.

A trip to the White Rim Trail is highly recommended!
Have you driven the White Rim Trail or a challenging dirt road with your truck camper? Please share your story about conquering this road.
Capitol Reef Off-Road Tips
ByMaggie MacPherson
Alaskan Camper owner, Maggie MacPherson, reveals where to go and what to see in Capitol Reef National Park. Don’t miss her stunning photographs and off road tips.
Alaskan Camper owner, Maggie MacPherson, reveals where to go and what to see in Capitol Reef National Park Utah. Don’t miss her stunning photographs and off road tips.
Capitol-Reef-National-Park
The first time we went to Capitol Reef National Park, we had a Mazda truck that was front-wheel drive. We got to a place that said that four-wheel drive was needed. We were disappointed. Afterwards we bought our Pathfinder and explored Utah again.
In 2005, we took our Alaskan Camper and four-wheel drive 2003 GMC Sierra 2500 to Utah for the first time. I had been there before, but there are always new roads to discover.
Spring and fall are the best times to go to southern Utah. The kids are back in school, there’s often water in the creeks, and the weather is comfortable. We’re lucky that we’re retired and don’t have to go in the summer when it’s too hot.

Capitol Reef National Park is wonderful even on the paved roads. There is a national park campsite there that is okay, but we prefer camping off the beaten path.
Capitol Reef National Park is a national park because it’s extremely wonderful. That beauty doesn’t stop at the paved roads. If you have a sense of adventure, and a suitable four-wheel drive rig, I recommend exploring the dirt roads in the park.

Above: Driving on Cathedral Valley Road, Utah
Cathedral Valley Road is a dirt road that you can get onto from Highway 70. Cathedral Valley Road is the main dirt road. There are spur roads off that main road. You need to decide to try them or not based on your level of comfort.

Above: Camping on BLM land on Lower Cathedral Valley Road, Utah
With our Alaskan Camper and four-wheel drive Sierra 2500, we’ve gone almost the whole way though Utah on dirt or blue roads, never once getting on a highway.
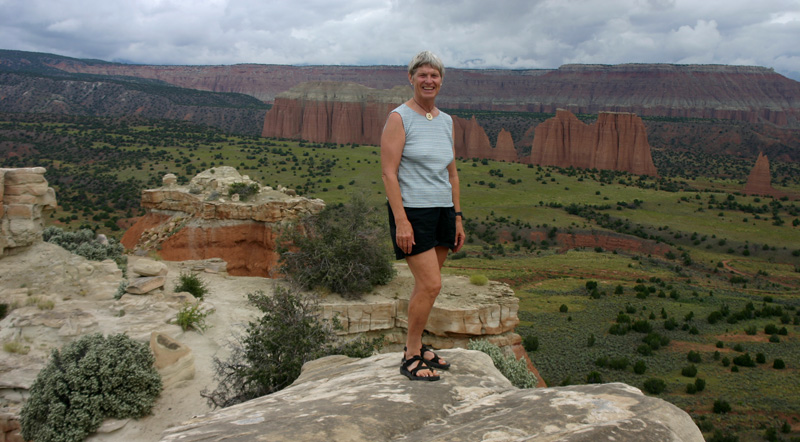
Above: Maggie at a scenic overlook in Upper Cathedral Valley
There is a scenic road from Capitol Reef down to the Glen Canyon Dam. You take the Waterpocket Fold Road from Capitol Reef to Notom Road. It goes along the side of the reef. When you get there, you have a choice, go over the Burr Trail to Boulder to Highway 12 to Hole in the Wall, or you can continue down south to Highway 20.
If you continue south, you can go to Glen Canyon Dam and take the ferry across there. That takes you to Halls Crossing at Highway 276 which is a paved road. Natural Bridges and Valley of the Gods is to the east. That is a road any truck camper can do.

Above: Solomon’s Temple on the road from Fremont’s Junction
Once you are in BLM land near Capitol Reef, you can camp anywhere. Do you want to be under a tree or look at Solomon’s Temple? One place we camped was right across from the Walls of Jericho and the Great Basilica. We usually look for where there is a former fire ring. We are conservationists and, if we can, we try to use a spot that’s already been used.


Above: Walls of Jericho and the Great Basilica
On the dirt roads, drive at five miles per hour, and put your truck into a lower gear. You can get across amazing things if you’re creeping along. You just have to have the time and the mindset. The rewards are incredible. You can go beyond where other people go if you have the right truck and equipment. Just be aware and responsible.

I have a funny story about Cathedral Valley. We saw a huge black cloud, and were worried about a flash flood. So, we went up to a high area to avoid trouble. We were in the middle of the rain storm, which was exciting and beautiful because we were out of the drainage area.
Then we realized we were in a place we shouldn’t be. We stopped in the road, looked around, and thought it would be a day to dry out. We were looking for a place to camp, and waiting out the rain.
When it stopped raining, we saw four porta-pottis on a truck. It was making its monthly trip to change out the porta-potties down the road. He drove with chains down the road, so we followed in his tracks. We were able to get out and continue on our trip.

Well, Bentonite is like clay. If you are on the road when it gets wet, you have no control. It’s like black ice. When Bentonite dries, it dries hard. Our truck was full of Bentonite. We had to go to a place to spray it off the bottom of the truck. One of our truck wheels was rubbing on it. Someone from town said to us, “I see that you have found Bentonite”. You don’t want to be around it when it rains.
Moab Area Off-Road Tips (Utah)
ByMaggie MacPherson
With over 130,000 miles in an Alaskan Camper, Maggie MacPherson points us to some must-see off-road locations around Moab, Utah. Do not miss Maggie’s amazing Moab photographs.
Moab, Utah is well known as an area for four-wheel drive Jeeps, but we have explored it from one side to the other in our Alaskan Camper and four-wheel drive 2003 GMC Sierra 2500. Within limits, we can go where the Jeeps go.
As always, we go as far as we can on backcountry roads, and then we hike even further. You have to have an adventurous spirit, and you need lots of time to drive these types of roads. There are times when we are traveling less than five miles an hour.

Above: Don and Maggie hiking at Fisher Towers near Moab, Utah
My first bit of advice is to go to the more popular places mid-week. On the weekends these areas and campsites can become quite crowded. We have always been able to find a campsite, but we go in when people leave, which is in the late morning. We try to find a campsite between 10:00am and 3:00pm.
The second tip is to invest in the National Geographic Trails Illustrated maps of Moab North and Moab South. The third is to check with rangers about the road conditions and the fourth is to be aware of the weather.

At the south end of the Dewey Bridge on Highway 128, turn east onto Shura Road. This eventually meets the Top of the World Road and then the Dolores River Outlook Road. These are all pretty good dirt roads and the scenery is spectacular. There are also many smaller roads off these, and depending on the weather and the capabilities of your vehicle, you can drive many of them with a four wheel drive truck camper. The round trip is approximately fifty miles. With lunch and stops for photography it takes about six hours. There are places to camp along the way. As always, try to camp somewhere that has been used as a campsite before.


Above: The Onion Creek Road drive to Hideout Canyon campground
Another great drive is Onion Creek Road to Hideout Canyon campground. Turn east off Highway 128, south of the Fisher Towers turnoff. This round trip is approximately thirty miles round trip and takes about seven hours with stops for lunch, photography, and exploration.

Above: One of the Onion Creek Road campsites
There are a number of designated, first come first serve campsites along the road as well as the Hidden Canyon Campground.

See the description of Castleton Road below for a possible loop. There are twenty-one creek crossings, beautiful scenery, a narrow canyon, and an outlaw hideout. Look for climbers on the Totem Pole spire.


Above: View from Castleton Gateway Road
Further south off Highway 128 to the east is Castleton Road. The Rock Creek Campground is at the junction of Castleton Gateway Road and the La Salle Mountain Loop Road.

This road takes you up into the La Salle Mountains and returns to Highway 191 south of Moab. If you are really adventurous you can do a loop on Castleton Gateway Road, pass the Fisher Point Overlook to the Hidden Canyon Road, and to Onion Creek Road.

Above: View from their campsite in Monti La Sal National Forest
When you are in the Monti La Salle National Forest you can camp almost anywhere. The red rock formations in Castleton Valley are amazing. In the fall, the cottonwoods on all these roads are spectacular.
On the east side of the town of Moab is Sand Flats Recreation Area. Take Sand Flats road east toward Juniper Campground. There are lots of individual campsites along the road, but this is a popular off-road playground. East of Juniper Campground the scenery gets really interesting.

Above: Castle Canyon Overlook with views to Castle Valley
About ten miles in there is a turnoff for the Castle Canyon Overlook. At the overlook are a few campsites with expansive views down to the Castle Valley. You can back track or continue on this road which travels southeast to meet a county road that heads back to Moab.
From Moab, take Highway 191 and turn west onto Potash Road. Follow this along the banks of the Colorado River to Long Canyon Road which climbs about 2,000 feet to the top. There is no camping in the canyon, but plenty of spots at the top with glorious views to the east of the 12,000’ Monti La Salles. The Long Canyon Road eventually runs into Highway 313 which takes you to Canyonlands Island in the Sky, Dead Horse Point State Park, and back to Highway 191.


Above: The views along Highway 128 near Moab
Fisher Towers is right off Highway 128. It’s easy to get in with any car, but it can be crowded. It’s a first come, first serve campground.

It’s one of my favorite campgrounds with spectacular sunsets on the towers.


We might stay a couple of days at the Fisher Towers campground, using it as our base camp, and do hikes around Moab. The four and a half mile hike into the Fisher Towers is one of my favorites.

It’s an adventure to drive these roads, and you have such a sense of accomplishment after you get through the tough parts. If your rig can handle it, this area is highly recommended.

You can read more about Maggie and Don’s adventures in their article called, "130,000 Miles In An Alaskan Camper".

1. Adjust Your Driving Style
When you buy an RV, you will learn quickly that your driving style can have a huge effect on your miles per gallon ratio. Fortunately, it's easy to change these habits and changing just one can increase fuel economy by up to 7 percent.
The first rule of driving an RV is to not accelerate too quickly from a dead stop. "Flooring it" can greatly reduce fuel economy, so a gradual buildup of speed is best. Similarly, going too fast can expend more gas. Every 5 miles per hour over 50, for instance, can end up costing an additional $0.17 per gallon.
Using cruise control will also be beneficial since it prevents variable speeds, which can use up more gas. And finally, avoid idling for too long. Shutting off the engine while waiting for trains or drawbridges is often more economical than idling for long periods of time.
2. Check Tire Pressure
Maintaining an appropriate tire pressure is one of the easiest, yet most overlooked, methods of increasing an RV's gas mileage. In fact, properly inflated tires can increase an RV's mileage by up to 3 percent. To ensure you get an accurate reading, tires should be checked before traveling for more than a mile.
In addition to improved fuel economy, proper tire pressure can also reduce wear and tear on RV wheels. This means they'll need to be replaced less often, and it will also reduce the likelihood of a blowout or tire failure. For those who simply can't remember to do this, having a tire monitoring system installed will be just as effective.
3. Ensure Appropriate Maintenance
Performing periodic service on an RV is also essential to improving fuel mileage. Replacing a dirty air filter, for instance, can increase an RV's mileage by up to 10 percent. It's also important to ensure that synthetic oil is used when getting an oil change, which can increase fuel economy by more than 2 percent.
The two biggest fuel expenditures you face as an RV owner are an improperly tuned motor home and faulty oxygen sensors. A tune up can literally increase fuel economy by up to 20 percent, and a faulty oxygen sensor can reduce mileage by up to 40 percent. Proper and routine maintenance can ensure you catch these issues before they ruin your gas mileage.
There are a variety of ways you can save money while enjoying your new hobby; increasing fuel economy is just one of these money-saving methods. For more money-saving tips and other helpful RV guides, sign up for our newsletter to have helpful hints delivered straight to your inbox.
5 Under $50: Little RV Items that Make a Big Difference

But over the years, we've found it's the little things that make a big difference in our travels. Some items we use over and over again, whether on fall weekend trips or month-long summer adventures.
Here are five inexpensive products that you will always find in our RV. They don't cost a lot of money, but offer lots of bang for the buck.
Premium Tire Pressure Gauge, $30
Talk to any RVer long enough and you will probably hear a tire blowout story. Test your tire pressure on every single traveling day to prevent this from happening to you. We learned this lesson the hard way, and now we have tire safety religion. A Premium Tire Pressure Gauge works well for us, and we actually travel with an air compressor as well, so we don't have to worry about finding a gas station pump.
Nightstick Dual Light with Dual Magnet Flashlight, $32
We use a flashlight so often at the campground that it was worth it to spend a bit extra for a quality one. We love this Nightstick, which has two lights--one that shines forward and one that casts light down toward the ground. Two built-in magnets allow it to hang nicely on the RV fridge so it's always easy to find.
French Press Coffee Maker, $32
We love our coffee, and we take camp coffee pretty seriously. After experimenting with many different products, the French Press has earned a permanent place in our RV. Since no electricity is required, you can easily use it even when boondocking or dry camping. We use the 34-ounce model because, with three young kids, there is never enough coffee in the morning.
Diesel vs Gas: Which one Should You Choose for your RV?

The urge to reconnect with the outdoors and the open road usually returns with spring and RV shows. Maybe you would like to sell your "old clunker" and replace it with a newer, more polished model. Or perhaps, on the eve of an upcoming retirement, you imagine yourself driving into the sunset at the wheel of your very first RV. When it comes to choosing an RV, it is important to make an informed decision before you buy, and the same age old question has fueled the debate with regard to the type of RV engine: gas or diesel? The answer is not simple as it often depends on many factors such as your travel frequency, maintenance, fuel economy, financial means and floor space needs.
Pros of owning a Gas RV
• If you're looking to travel only once in a while, then a smaller gas engine RV (35 feet or smaller) could make more sense.
• Since service and fuel stations are common, gas is much more accessible and affordable than diesel.
• Gas engines are also more resistant to cold weather than diesel engines.
• They have higher RPMs (about 6000 RPMs), allowing for a smoother, quieter ride with faster acceleration.
Cons of owning a Gas RV
• Gasoline has a strong odor and a short shelf life due to evaporation.
• Gas engines have weaker towing power compared to diesel equivalents.
Pros of owning a Diesel RV
• RVs with diesel engines are an excellent choice if you are looking to travel frequently and for longer periods of time.
• They tend to offer more efficient fuel consumption, meaning less frequent refills at the gas pump.
• Diesel engines usually have better torque. This means improved towing capability, an important factor if floor space is a priority.
• If well maintained, diesel engines have a longer life than gasoline ones and can still perform reliably after extensive mileage. This means diesel RVs often retain a higher resell value after a few years.
Cons of owning a Diesel RV
• At a range of $2.00 to $3.50 per gallon, diesel fuel often costs more at the pump. However, this is off-set by their superior fuel economy.
• RVs with diesel engines have lower RPMs than those with gas engines meaning slower acceleration and lower top speeds.
7 Great Tips for RVing with Pets
RVing with pets can be a wonderful experience for you and your beloved furry friends. Here are seven tips to keep in mind when RVing with your pet.

1. Mind the Paperwork
Bring your pet’s health certificate and vaccination records, since many RV parks require you to have them with you in order to enter the grounds. You may also need to contact RV parks that you plan to stay at to make sure they accept your specific kind of pet.
2. Make a List
The essentials like food and water are a no-brainer, of course, but be sure to write down absolutely everything you need for your furry friend, including dishes, leashes, a litter box for your cat, waste bags, treats and toys, exercise pen, cages, a brush and a crate, if needed. Don’t forget medications if your pet takes any.
3. Call Ahead
Get in touch with the RV parks and campgrounds you plan to stop at. Make sure they allow pets, and also ask if they have any rules or regulations regarding pets at their facility. You will also need to call and see if the RV park or campground allows pets such as birds, bunnies and guinea pigs, or if they only let dogs and cats on the grounds.
4. Stay up to Date
Make sure your pet's vaccinations and shots are up-to-date, with the records to prove it. This will avoid paperwork hangups, but it's also important in order to keep your animal companion safe from disease as you travel through new areas.
5. Mark Your Pet
If you haven't already done so, take the time to put your cell phone number on your pet's ID tags. You still want your home address and landline phone number on the tags, but that won't be of much help if your pet cockatoo flies away from the RV while you're still traveling. This will ensure that good samaritans can contact you in such a case.
6. Protect Your Pets from Creepy Crawlies
Bring along flea and tick spray, or make sure your pets are already treated before leaving on the RV trip. Even pets like hamsters, guinea pigs, bunnies and ferrets can pick up fleas and ticks, especially in the great outdoors, so ask your vet about treatment for your particular furry family member.
7. Be a Good Citizen
Remember to pick up after your pets in all locations. This is not only polite and courteous, but it also encourages RV parks and campgrounds to keep allowing pets. If you have a non-traditional pet like hamsters, ferrets or birds, call the park or campground beforehand and see how they handle waste removal.
5 Tips for Efficient RV Cleaning

It can be difficult to understand just how to get your RV cleaned thoroughly given it's large size and numerous parts. Cleaning is a necessary part of owning an RV, however, so the job must be done. With these few tips, you can efficiently clean your RV and have it feel like new.
1. Use a Low-Pressure Washer
You might think a regular pressure washer is for an RV—but this is actually not the case. A high-pressure washer can do serious damage to the cracks and seals on your ride. Use a low-pressure washer instead; it will give you enough pressure to clean the exterior of your RV, but it won't be forceful enough to cause lasting exterior damage.
2. Add Vinegar to the Wash
When hand-washing the exterior of your RV, add vinegar to your cleaning solution. This will help prevent water streaks from forming on glossy and transparent surfaces. The vinegar will ensure no smears are left on your vehicle and your RV will show nothing but a shiny finish.
3. Buy an RV Cleaner
A myriad of special RV cleaners are available on the market these days. They contain the right ingredients to ensure your RV's surface gets as clean as possible, and they don't contain harsh additives that can cause decals to loosen or paint to chip off.
4. Avoid Microfiber Cloths
Microfiber cloths and polyester are quickly becoming the new norm for getting things clean. In the case of an RV, though, microfiber and polyester cloths should not be used. They can cause damage to the finish and even rub off the sealant. Stick with cotton and you'll ensure you aren't taking any finish or sealant off your vehicle when you clean it.
5. Treat Your Tanks
RVs come with two tanks: one for bathing water and one for toilet water. While the bathing water tank may not become very dirty, the toilet water tank needs to be properly treated to keep odors away. Enzyme-based chemicals need to be used so any solids can be broken down efficiently.
NEW DECALS
|


No comments:
Post a Comment